Well, this isn't exactly outside in the garden, but it is the only thing I have growing in my indoor "greenhouse" right now. (AKA: unused bathtub. Which, in my opinion, is the *perfect* place to put an indoor growing area!)
These are sweet potatoes that I am attempting to grow "slips" from. Did you know sweet potatoes aren't planted the same as potatoes? Turns out they are more related to the Morning Glory flower than 'taters! (Who knew?!)
Supposedly, if I keep these in water for a couple weeks I'll have very pretty vines growing off of them, that I can then pop off and continue to grow in a glass of water before planting outside when the weather is nice and warm!

I've only had these in for three or four days, and the shoots are starting already!!

These are the blueberry bushes I got at Costco ~ I'm happy to see them growing.

Sorry about the side-ways picture (darn thing won't let me flip it), but I wanted to show you the Romaine lettuce I've been growing IN WATER for several weeks now. There are four crowns here, and just like you see on Pinterest, the center leaves have continued to grow and are now big enough for me to harvest some for a tasty salad if I so choose. I imagine I'll put these in the ground next week, but I really don't have to ~ they're growing fine as they are & I feel like I'm getting double portions out of the lettuce I paid for at the store!

I tried them inside under the lamps in this special tray that has a watering pad underneath to keep them moist, so it wasn't a water issue. But then they grew tall and spindly and fell over like this, so I added a fan, which I read online would help with that. Nope. That set I tried to put outside in my greenhouse and on an unusually sunny day a couple weeks ago they all fried. Now, this third set, again started under lamps and with a fan, I've set outside and they just aren't doing much. I don't hold out much hope, and I'll probably keep an eye out for broccoli and cabbage starters at the local nursery.

This is one of three celery that I started from stumps of celery I'd bought from the store and grew in water for a while and transferred outside a couple weeks back. They are doing great, and I'm very hopeful I'll be harvesting plenty of stalks this summer! Thanks again, Pinterest.

Sugar snap peas, anyone?! Yes, please, and thank you!!

Rhubarb! One I grew and the other from my generous neighbor. Really excited about these, but I need to find them a permanent home since they are perennial.

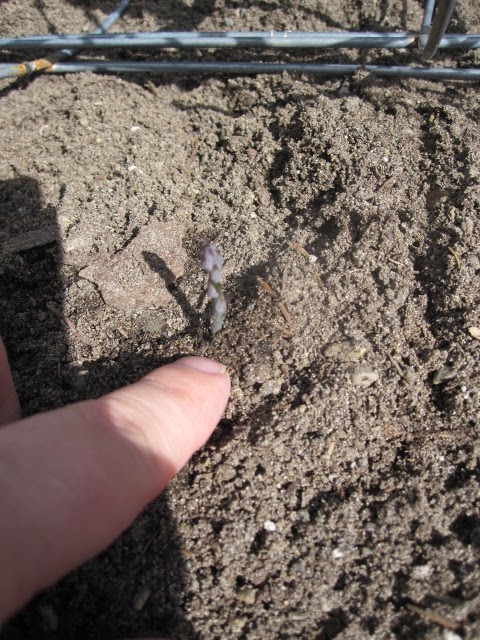
Speaking of perennial vegetables! My asparagus is coming up!!!! :D I couldn't be more excited! This is like free food that just keeps coming back again and again every year. Love it. (Although, I won't be able to EAT any of these for the next couple years...)
Potato towers! Yep, Pinterest, again. ;) I have read many blogs and websites about how people do their towers - some do dirt, some all compost, others all hay. So, I decided to do a mix of all of that! ha-ha. There are three different varieties of potatoes in here - white, russet and Yukon. Some are seed potatoes and others are from the store. I've had people swear by both methods. Some are cut down to two eyes, some are whole. Again, I've received varying advice. SO, this is ultimately an experiment and hopefully I'll be able to gauge what is successful for how I want to do it in the future.

Raspberry canes my generous neighbor gave me. (one bunch is red, the others are golden) They are waiting for their new home along a split rail fence my husband is building next weekend.

These are my shelling peas. They are much shorter than the sugar snaps and I'm not sure why. I'm assuming it has to do with the different variety, or the fact that there was a bunch of grass growing up around them and trying to choke them out before I weeded today... (oops!)

These three rows are: walla walla onions I bought as starters (put them in these last few days), sweet onions I bought as bulbs (put in the ground about 3 weeks ago and they are 2-3" tall), and garlic bulbs (I put in shortly after the peas in late-February or early-March that are several inches tall now). I wish this photo would have come out better so you could see how tall the garlic is.

These are my sad, dilapidated herbs I would love some advice on... I have thyme, sage and oregano (with some stray crocus flowers jutting up through the thyme) and I don't know how to tame them. I thought they'd need to be cut-back at the end of summer, so I hacked away at them. That didn't seem to do much for them. Any advice anyone can give me...? Do they need to be pruned at all? They seem big to me!

This is the mint I am happy to see is returning. The sticks are the branches from the end of last year's growing season. I guess this year I know I can cut them all the way down to the dirt-line and they'll grow back. I would love to put this in the ground, but I hear it will take over the area you put it in, so I need somewhere to plant it that I don't mind it taking over...

Well, that's all for now!
Thanks for checking in on what's growing on in my garden right now. I'm very excited that our last frost date is next week because I'll be putting much more in the garden very soon!
