Monday, February 25, 2013

Making Your Own Baby Food

I made most of my own baby food for my last baby with the goal of feeding him healthy homemade food. This time around, I am enjoying making my little girl's food for the health-factor as well as the cost-savings. Today I made 42 servings of vegetables for less than one-third the cost of retail organic baby food in one hour. I compare the cost of my homemade food to the more expensive organic baby food because all the fresh veggies I cooked were, of course, organic. (Soon they'll all be from my garden, which will be even more thrilling!)

Today I started with 2 sweet potatoes, 6 small carrots, scant 1 cup of frozen peas, a 2-pound container of pre-chopped butternut squash, and 1 pound of green beans. The cost off all of this produce totals around $10 (thank you Costco!). (I wish I would have taken a photo of all this beautiful produce in a pile.)

The green beans, squash and peas could just be added straight to their pots and pans with an inch or so of water. I had to peel the carrots and sweet potatoes first, of course, before I added them. (I kept these scraps for the hamsters and chickens!)

Here are all the veggies steaming on the stove over medium high heat. They only take about 20-minutes, or so, to get nice and soft.


 Meanwhile, I set up my blender and containers. I use whatever containers I have on-hand, as well as freezer safe plastic bags and ice cube trays. All washed well, of course.

When the thicker veggies are fork-soft, I turn all the heat off and start spooning the veggies into the blender.


I usually add a cup or so of water, or about half way up the veggies.

I use my "blend" setting, and let 'er rip!

As the blender gets going, I help it a little by scooping the veggies away from the side and toward the middle. (Being careful not to let my scraper go down too far toward the blades!)

As soon as I see this little swirl in the middle I know that the veggies are being blended all the way to the bottom. (If I don't see this, I add splashes of water a bit at a time until it has enough liquid to fully blend.)

I pour the veggies into my containers, leaving a bit of room for expansion when it freezes.

If I use plastic bags, I push all the air out of them and label them with contents and date.

This time I even decided to make some mixed vegetables, which I've never done before. I think the smoothness of blended carrots really improves the peas, which have an odd texture even when pureed. (You can see that the blended squash is still hanging out on the sides of the blender ~ I didn't bother to wash the blender between veggies today since I was experimenting with mixed vegetables. I figure, why not?! More tasty goodness not washed down the drain!)

I filled a couple ice cube trays with sweet potatoes and green beans and smoothed all the air bubbles out and covered them with plastic before putting them in the freezer. After they are frozen, I'll pop them out of the trays and into a large freezer safe plastic bag with the contents and date written on the front. (It is easy to pop two or three of these into a bowl in the morning and let them come to room temperature by lunch time. Then after the lunch bowl is washed, pop another couple in to thaw-out for dinner!)


The fruits of my labor! Or, should I say, the veggies of my labor?!
(I actually forgot about the green beans until after this photo, so there is actually more than this.)


All the yummy food tucked away in the freezer. I like to use these plastic tubs in the freezer door so the small containers are not sliding around all over the place in the larger spaces. (You can see the bag of peas I did about a month ago that have been popped out of the ice cube trays.)
 After these are frozen, they'll be added to the containers in the door, too.
 
So, that's about it. Easy peasy. About $10 of food split into 42 servings. This will last my daughter about three weeks of lunches and dinners (of course, supplemented with crackers, cheese, cereals, yogurt, eggs, etc.). Next time I'll do apples, peaches and pears and make breakfast servings.

Again, it only took about an hour to steam, blend, bag and store all of this. Certainly it took longer when I was learning, but it really is that easy. The "clean-up" is about a full bottom rack in the dish-washer, which is a small hassle for the pure goodness I just made my precious baby.

EDIT:
**I have to add, too, not to get pulled into the hype that is so popular right now that you need a special system and equipment to make your own baby food. If you have a pot or pan you can add an inch of water to, and a blender - you are set.


Friday, February 22, 2013

Getting an Early Spring-Fix by Starting Seeds

I've mentioned in other posts that we are going to "do-it-up-big" in our garden this year, in hopes of moving toward more sustainable living. We are trying to get off on the right foot in a lot of ways to ensure success. One thing I'm doing this year that I haven't bothered to do before is start seeds indoors. I always hear around this time of year that Northwest gardeners should start seeds indoors to extend the growing season.

Well, all my seeds came in the mail recently, so I bought some growing light bulbs and lamps, as well as self-watering trays and set them all up on a plastic shelving unit in a bath-tub we rarely use. Voila! A little indoor greenhouse!

However, when I looked online at which can, and should, be started indoors I was a little disappointed. Out of all my seeds (beans, cucumbers, radishes, peas, spinach, corn, pumpkins, cabbage, broccoli) ~ all I have is cabbage and broccoli that they suggest starting indoors at this time. (My tomato and pepper plants are coming as starters in April, and potatoes, onions and garlic will be planted as starters as well.)

Oh, well. At least it gave me some experience with the process. Here's my set up.

The lamps on top were just cheapies from Home Depot, but the bulbs are growing lights that only cost a few dollars, and the tray is the Burpee XL Ultimate Growing System. The peat pellets are in the container already and the instructions are very clear on how to layer the watering mat and risers under the plant tray and fill from the bottom with water. It has stayed moist all week without a re-fill.

I have extra peat pellets below for staggering some starters through the beginning of the season.

(On the left you can see a couple celery stalks that I am re-growing after we bought them at the store and ate the tops of the stalks. On the back right is an avocado pit I am trying to grow. Down below I also show a close-up of how I'm storing my seed packets this year - I am reusing a baby formula tub! It clips shut to keep them dry and works wonderfully to stand them all up in alphabetical order. I'm quite pleased with it.)


The seed packets said 10-21 days until germination, but after 5 days here is what we found!!!
 
I'm pretty excited about the prospects of starting my garden with these little seedlings, but I'm almost concerned they are going to get too big for their little pots before the weather will allow me to put them outside!!

Has anyone else started seeds indoors this early? What was your experience? Please share some tips and hints below!!

Thursday, February 21, 2013

Lesson #57 - Chickens are Messy.

So, it turns out chickens are messy. Go figure.

I had read that they love to scratch, but what I didn't understand is that instinct extends to anything and everything on the ground, and silly me ~ I placed their feeder on the ground. They've been scratching it out all over the place, making a mess and wasting food in the meantime. They've gone through, probably, 3 pounds of food in as many days. Perhaps that is normal, but I'd like it to be going into their bellies, not spread over the ground and mixed with poop!

So, I swung by the local feed store to look at different types of feeders. I was thinking of those nifty little contraptions that are made to hang in the corners. They sure are tiny, though. I don't want to be out there filling them up breakfast, lunch and dinner! So, I asked the helpful young man who was there and he informed me that chickens need their feeders to be at chest level so they can peck the food easier. (Something about not being able to peck at anything head-on, but rather having to swipe at it, which knocks it around... not sure I understood that properly, though.)

 
He said he just has his propped up on bricks. It struck me that I'd read several places online that people had their food and water up on bricks. I guess I just didn't understand why. Well, that's an easy fix! And free! We have several bricks and cinder blocks laying in a scrap pile next to the garage!

I came home and dinked-around with different combinations of bricks and here is what I came up with:

So, now, hopefully the food and water will be easier for them to use, and they won't make such a mess of it!

(He also mentioned that mounting the feeders puts them closer to the roof and takes away any room for the chickens to jump on top of them and try to roost there. I have noticed that Pepper really likes to perch on the water, so that will certainly help there!)

Tuesday, February 19, 2013

How do you like your eggs?

I have to admit I rushed out at first light to let the hens out and see if they had left us any breakfast in the laying boxes. Sadly, there was nothing in the coop but three piles of garden gold. Ah, well. I figured it might take them some time to get settled in and feel comfortable enough to lay.

All morning we have been taking breaks from homeschool to look at the girls out the window or go out and visit them. At one point I noticed that Ginger was being very vocal and went up into the coop. Although I was dying to stay out there and peek at her, I gave her some privacy. When she came out a half-hour later, though, you better believe we were donning gloves and grabbing the camera and running out to see if she'd given us our first oval gem.

Sure enough!
 (In the left laying box you can see the golf ball we put in to encourage them to lay in the right place!)
 Our first brown beauty:

Now, I have heard from various sources that they do or don't wash their eggs. One friend only washes them if she knows she'll be serving it to guests, another says she only washes it if it has a bit of poo on it. Well, ours had a small spot of mystery wetness on it, so I decided to be "safe and sanitary" and give it a wash.

I have read that a vinegar/water solution is best for this, but I grabbed my bottled of straight white vinegar instead. I have to tell you, it did the oddest thing to the egg... I felt this sort of jelly substance well up as the vinegar ran over the egg. It startled me, so I immediately shoved it under running water, thinking the whole thing was going to turn to goo in my hand! I tested it, and nope - no goo. It was still hard. And, in fact, darker.

I ran to tell my husband about my little adventure and he pointed out that when we dye Easter eggs we soak them in vinegar with the color pellets. Ahhhh, of course. It etches away part of the shell to make the color stick. Perhaps if I would have left it in vinegar it eventually would have eaten it away, but just to rinse it didn't do anything bad. I think next time, though, I'll rinse the eggs in a vinegar/water solution if they need to be washed. (If nothing else I'll at least avoid the nasty jelly feeling.)

Monday, February 18, 2013

Here chick-chick-chick!!

We got our chickens today!

There are three of them: two copper colored and one black. I tried to convince the boys to let me name them Pepper, Paprika and Ginger & post a sign that said, "The Spice Girls." But they wouldn't go for it. (There is something terribly amusing to me about naming chickens for spices I would eat them with.)

So, in the end, I only got to name one little girl: Paprika. My oldest boy named his copper beauty "Madam Flappy" for the obnoxious way she beats him with her wings when he tries to pick her up. I get a kick out of it, so "Madam Flappy" it is! (Plus it reminds me of the perky grandma squirrel on The Animaniacs cartoons, and that makes me smile.) My younger son made the logical connection that his chicken is black and steel is black, so she gets the strong name of the group: Steel.

Paprika, Flappy, & Steel:


Paprika is actually a Buff Coronation Sussex, Flappy is a Red Star Sex-link, and Steel is a Black Star Sex-link. I've read that they are all well-suited to be backyard chickens, are docile and high producers. (Their previous owners collected 6 eggs just this morning!)

We enjoyed watching them get adjusted to their new home this evening. They are very laid-back. I'm curious to see if they feel so comfortable that they will lay tonight or tomorrow... we'll see! The adventure begins!!

Check out my coop here.

Saturday, February 16, 2013

Testing in Progress, Please Do Not Disturb - Soil Testing my yard

I really want my garden to be successful this year if we are really to grow enough food to make a difference in our grocery budget (this summer with fresh vegetables, and through the winter with canned vegetables)! So I thought I'd get off on the right foot by testing our soil and see if we need to be adding anything in particular to it when we till next week.

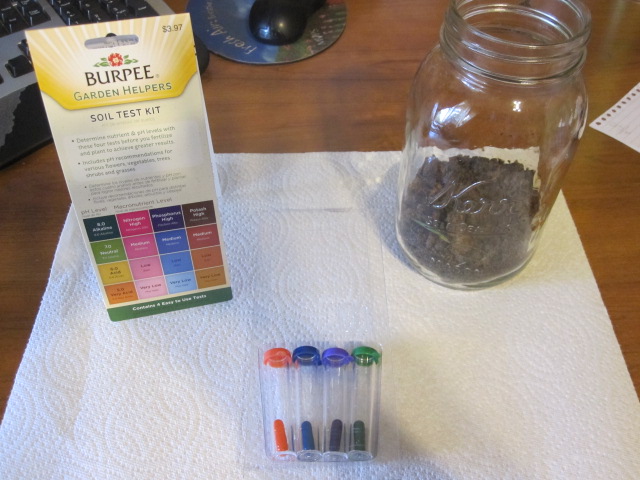
I bought an inexpensive Burpee Soil Test Kit from the local hardware store. It looks like a miniature science experiment and somehow intimidates me. It turned out not to be nearly as complicated as I had feared. In fact, not complicated at all.

Here are the steps and what I learned:

- I had to collect soil from four different areas of the yard from about 4-inches below the surface


- For the pH test, I added a small amount of soil to the proper tube
 

 - I added the powder from the green capsule

- Added water to the top

- Shook it up

- Compared it to the chart. I have "Neutral" soil! ["The pH level of your soil determines how well your lawn or plants can use nutrients such as nitrogen, phosphorus, and potash (potassium). Some species prefer acidic soil (low pH) while others need alkaline soil (high pH).]

- The next step was to fill the jar of dirt to the top with water, stir it and let it sit for 10 minutes. I added that water to each of these tubes and the contents of their capsules to test for Nitrogen, Phosphorus and Potassium (Potash).

- They had to sit for a few minutes

- I have a medium amount of Potassium, so I'm not going to have to worry about that one. ["Potassium, also known as Potash, increases vegetable and flower production."]

- The color looks a little different on the computer screen, but our Phosphorus levels are low. ["Phosphorus is important for young plants and seedlings, and aids in root development."] An article on eHow tells How to add Potassium to the Soil, and happily I'll be able to use our chicken manure for this!

- Nitrogen is so extremely low that the color barely even registers as pink. (Again, the computer screen makes it look a bit different.) ["Nitrogen is necessary for lush green lawns, and leaf and plant development in both flowers and vegetables. Too much, however, can lead to leafy plants with few flowers and fruits."] An article on Yahoo VOICES tells How to Naturally Add Nitrogen to Your Garden Soil, and happily I'll be able to use the compost from our kitchen scraps for this!

I was pleased to learn that we were already planning on amending our soil in the way it needs to be amended, and that we already have these things on hand and won't have to purchase anything separately!

Have you ever tested your soil and amended it depending on the results? Please share your experience below!

[Quotes defining the elements were taken from the Burpee Soil Test Kit package.]

Friday, February 15, 2013

My Daddy's Jambalaya

When I was engaged and still living at home my father took me under his wing in the kitchen and made sure I knew how to make some tasty meals before I got married. Now, my Daddy is from the South, so this was a good, good thing. My favorite dish he taught me was how to make Jambalaya. I've tweaked it here and there over the years and made it my own, but because he taught me how to make it all those many years ago, it will always be "My Daddy's Jambalaya."

MY DADDY'S JAMBALAYA

Ingredients:
- 2 large chicken breasts, chopped
- 1 lb. chub of Italian sausage
- Cajun seasoning
- 3 cups short grain rice
- 6 cups chicken broth
- 1/2 sweet onion, chopped
- 2 c. celery, chopped
- 4 cloves of garlic, minced
- 1 can diced tomatoes

Directions (to be made in large pot / dutch oven):
- Generously cover the meat in Cajun seasoning (depending on how spicy you want it)
- Brown the sausage over medium-high heat, breaking it into large chunks
- Add chicken when sausage is partially browned and continue to brown both
- Remove the meat (I scoop it out with a wire spatula like this.) and set aside
- Add the onions and celery to the pan and cook on high heat until onions begin to look translucent
- Add garlic and tomatoes and give everything a good stir
- Add the rice and liquid, again mixing well
- Add the meat back in
- Cook on high heat until the pot starts to bubble, then reduce heat and simmer, covered, for 20 minutes, stirring occasionally to make sure it doesn't stick to the bottom.
- For a spicy kick, sprinkle with Crystal's Louisiana Hot Sauce

Step-by-Step:

1. Brown the sausage, breaking it up into large chunks. (I used to use links, but my family prefers the way the sausage is more present throughout the dish when we use ground meat.)


2. Add the chicken when the sausage is partially browned, and finish browning them both together. At this point you might need to add a splash of cooking oil if the sausage didn't leave enough fat in the bottom of the pan.

3. Remove the meat with a tool like this and set aside in a bowl (forgot to take a picture of that step!)

4. Add the onions and celery to the pot and stir-fry them in the fat left behind from the meat until the onions start to look translucent, then add the garlic (fresh or from a jar).

5. Dump in the can of diced tomatoes.

6. Add the rice.

7. Add the meat back to the pot.

8. Pour in your broth (you can also use a mix of broth and water. I usually use one of these boxes which yields about 4 cups, then I add another 1 1/2 cups of water since the tomatoes add some liquid of their own).
 
9. I forgot to season the meat with the Cajun spices, so I am adding them late in the process, but this batch came out really well, so I don't think it mattered too much. (If you can't find Cajun seasonings, you can make your own by mixing 1 Tbsp. garlic powder, 1 Tbsp. onion powder, 2-3 Tbsp. seasoning salt, and salt/pepper/cayenne pepper to taste.)

10. This is what the yummy mixture looks like while it is waiting to boil. (It looks a lot like gumbo at this point!)
 
 
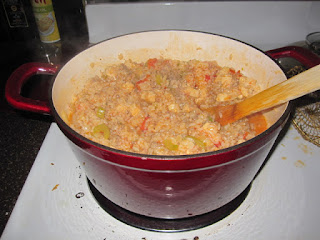
11. Our finished product.

Every night after dinner my husband gives me a kiss and says something like, "Thank you honey, it was really good." This one got me two kisses tonight! ;)

I hope you and your family enjoy it in good health.

My love affair with Pinterest - Really, How I think Pinterest has enhanced my life

Pinterest, at first, overwhelmed me! I couldn't figure out what in the world all these "ads" were all over the page and why were there so many of them!? So... very... many... I couldn't even scroll through them all! They were never-ending. At last, a good friend came along side me and sat me down and showed me how to use Pinterest for my benefit. (Thank you, Jennifer.)

Once I realized what I could do, Pinterest became this out-of-the-closet Organization Freak's DREAM!! Scrolling through pages and pages of what I first thought were ads and now understood were people's good ideas that they wanted to remember, was fun and inspiring!

But, then, Pinterest scared me... People were following me! <read in whisper voice> I immediately started to look for a way to kick those people off my page. Why are they following me? Who are they!? What if I don't want them there?? There is no way to do this. No way I found anyhow. So, I just settled in and got used to the idea that others, in fact, valued the same things I did and wanted to see the things I had found.

Soon, I started getting excited each time I logged on and my "Followers" number had risen! Indeed, I got a little puffed up and proud of myself ~ as if it were some reflection on my personal value. I write of this in the past tense, when really, honestly, I still get a little excited when I get more followers.

Right now I have 117 Followers, and am Following 197. I have 1,823 (!!!) pins, spread over 39 boards. "Thirty-nine boards?!," you say? Okay, perhaps it is a little much. But the recipes category was getting a little full, so I broke it down into different types of recipes.

My boards are: Recipes, Recipes - Breads, Recipes - Slow Cooker, Recipes - Sweet Stuff, Recipes - Veggies as Sides, Recipes - Canning, Recipes - Salads, Recipes - Breakfast Foods, Recipes - Appetizers & Finger Foods, Gardening, Chickens, Goats, Home Making, Crafts / Project Ideas, Sewing, Knitting & Crochet, <3, Parenting, Baby, Kid Stuff, Homeschool, Teaching Resources, Holidays, Holidays - Fall, Holidays - Christmas, Beautiful Pictures, Dream Home, Europe, Doors, Movies, Sports, Music, Books, Camping, Photography, Health & Fitness, Words, Mish Mosh, and lastly, because it is least: My (barely existent) Style.

In the end, all of this would be useless fluff if I didn't really use it. And, I'm happy to say, I have! I truly believe Pinterest has actually enhanced my life. I have become very inspired toward Sustainable Living with all of the information I've seen on making my own bread, raising animals, sewing, etc. I have learned a ton that I am applying in my home (I'm cleaning with vinegar for the first time ever), garden (you should see the plans I have), and health (honey and cinnamon for a sore throat actually works!). I have tried countless recipes, many that my family loves and we now make regularly.

Here is the most recent recipe we tried. I made it yesterday for dinner. It was pinned by an old high school friend (thanks, Cliff), and comes from My Daily Dish blog.

Beer Can Crockpot Chicken
4-6 Chicken Breasts or 1 Whole or cut up Chicken
1 Can of any kind of Beer
1/2 tsp Garlic Powder
1/2 tsp Basil
1/2 tsp Paprika
1/2 tsp Black Pepper
1/2 tsp Kosher Salt
*You can use whatever spices you like
Put all ingredients into crockpot

If frozen cook on high 4-5 hours or low 8-10
If fresh cook on high 3-4 hrs or low 7-8 hours

We love making the grill version of this in the summer, in which we use a bit of butter on the bird, too. I think I will add that next time I make it in the crock pot.

Hope you enjoy!
Happy Pinning to my Pinterest friends. ;)

Thursday, February 14, 2013

Valentine's Day: Big deal, or not? - What seventeen years of marriage has taught me

Valentine's Day has never been much of a huge deal for my husband and I. Surely we have exchanged the mandatory cards, chocolates, and little gifts. He's even gotten me flowers most years. We've gone on the occasional "big date" ... I think. It is hard to remember eighteen years of Februaries!

So, it isn't that we don't celebrate it, or even think poorly of it as some do. We just don't do it up big. I've wondered at this each year because it seems odd to me for a couple who loves each other as much as we do to not go all-out on the "Big Day of LOVE!"

Here is the conclusion I've come to: Love is for all the time.

After seventeen, going on eighteen years of marriage, I've learned that marriage is HARD. It takes constant work, constant sacrifice, constant evaluation of your own heart and an extreme amount of commitment. Both people giving ~ not 50/50 ~ but, 100/100, as our Pastor Wes says.

I'm sure anyone who is not married, or who may be in an unloving marriage right now, might say, "YUCK!" Who needs that?! Why would you do that to yourself?! The sea is full of fish and life is like an all-you-can-eat sushi bar!

Okay, ...have you seen the questionable pickings at an all-you-can-eat sushi bar?...

This may be a funny illustration, but the example it shows of quality is a perfect one.

Yes, marriage is hard. But, wow... it is WORTH IT.

Not just for the happy times, the laughter, the true friendship, but (and here's the kicker: especially...) in the tough times. The times when I achieve the great feat of swallowing my pride to allow him to have his way when I wanted my own. The times when I serve him unselfishly. The times when I pray for him when I'm angry. The times we both sit down and wrestle through a topic calmly instead of throwing things. Those times. Those times are the best times of marriage.

Because I see the great joy I give my husband when I can swallow my pride (which isn't as often as I'd like, mind you). I see the contentment in his life when I serve him unselfishly. I see the growth in him as I pray for him and God reveals to me a glimpse of the man He has called him to be. And I see the smile on his face as we end a rough conversation in peace and reconciliation.

It is through these rough times when God is glorified in my life that He is, in turn, glorified in my marriage, that the true joy of the union shines through.

So, yes, while we may celebrate Valentine's Day and exchange special treats on this day, it really is the other 364 days in the year that matter in building a relationship worthy to be celebrated.


PS - If you want to know what we exchanged this year: I got him a plant to keep in his office and his favorite bottle of whiskey, he got me a pair of overalls. I couldn't be happier! While it is not the traditional gift, it shows that he knows where my heart is right now ~ and that is in the garden! Many thanks, honey, many thanks.

Wednesday, February 13, 2013

The State of the Media - a short social studies lesson for any family

Last night President Obama delivered his fifth State of the Union address. My 12-year-old and I sat down to watch the last few minutes and some of the media coverage, as well as the Republican response.

My 8-year-old became interested as well as mommy began interjecting commentary into the programs, as I'm sure many citizens across the country did. My boys began asking pointed questions about the differences between what was being said in each speech and by the news commentators afterwards.

We discuss politics a lot with our boys, so this wasn't anything new. What was new, and what our lesson evolved into, was that they were catching the partisan messages coming across in the news commentary as we switched channels and listened to the reports.

I began to explain that different news networks covered stories with different slants. We went to the internet to see some examples in the newly posted headlines from the speeches that were given. I wish I would have taken screen-shots from the headlines we viewed, because their stark contrast was so amazingly clear that even my younger son picked up on it. "But, Mom, CNN makes it sound like this when FOX is making it sound like that!" Yes, son. Welcome to the world of the partisan media.

Now, this is not a blog about which is right or wrong, or being conservative or liberal. What it is about is teaching our children to become discerning consumers of media, and being discerning ourselves. I admit, for a long time I was not. I was more of an ostrich with its head in the sand, just ignoring it altogether as much as I could. I wonder how many Americans are still in that place.

"But, Mom, how can they do that?! Isn't the news supposed to just state the facts?"

Now, of course, I could have launched into a big moral speech about how the media needs to be doing a better job. But, really, in all honesty, what I said to my son was... "Honey, these people are just human, too." I went on to point out that each of us has our own beliefs and some we are very passionate about and asked if they thought they would be able to completely leave their beliefs out of things if they had the opportunity to be heard by a lot of people and possibly sway others to your opinion. It would be hard! I'm not sure I could do it. In fact, I'm sure I couldn't. I'm too opinionated.

Now, do I just let the media off and say, "Oh, well. People will be people?" No. I do believe they should hold themselves to a higher moral standard or put a system of checks and balances in place. But can I do anything about that? I suppose I could do it by not watching the mainstream news networks on TV or the internet. Where I really feel my power lies is in my children, though.

If I can teach my children to understand that news can be, and often is, delivered with a slant because of the network's or individual's personal filter, I can teach them to be discerning media consumers and check their facts before they believe something. Of course, this argument could be pushed to the point of instilling cynicism, and I don't want that for my kids. I just want them to be wise, ...and not bullied.

So, I encourage you to have this discussion with your kids. Go to the internet, pick out headlines from different news networks or newspapers that are all on the same topic and discuss how the headline makes that story sound. Do they use positive or negative words? Do they seem to be making accusations?

You can, of course, go on to discuss what your family's beliefs are on the topic, but be sure to point out the differences in stories and ask your kids why they think that is and what they should do it about it. Lead them to an understanding that they need to be wise before deciding to believe something they read or hear.

Tuesday, February 12, 2013

Where did that Man-Child come from?!

Well, it is official. My oldest son is taller than me and has the same size shoe as my husband. Where did this man-child come from?!

I used to joke that it was "the hormones in the milk" that caused all this crazy growth, and sadly while that may be true to a degree, I know it is also the wonderful natural process of growing up. And while facial hair, pimples, stinky armpits and irrational mood-swings aren't always a walk in the park, I can say for the most part that having a pre-teen is a wonderful experience. I am more often in danger of swelling from pride than perturbed.

 
There are many lists floating around these days of the 20 things a mom should be sure to say to her son. Here is a bit of a different list. These are five scriptural truths I know about parenting that go into raising him up to be the excellent young man that he is with the goal of becoming the man God has for him to be...
 

1. I rest assured that God has a plan for his life, so I don't have to interject my will over what he is to become. (For I know the plans I have for you, declares the Lord... Jeremiah 29:11)
 
2. I am confident that his faith will sustain him because he has made the choice to follow Christ. (Raise a child up in the way he should go... Proverbs 22:6)
 
3. I don't have to over-schedule his days ~ I can let him play and be a child without fear that he will miss out on every little experience. (There is a time for every activity under heaven... Ecclesiastes 3:1)
 
4. I don't have to rescue him from his poor choices; I can be confident that allowing him to learn from natural consequences is beneficial. (...we know that suffering produces perseverance; perseverance, character; and character, hope... Romans 5:3-45)
 
5. I can expect him to do chores as part of the family team without feeling guilty for it, knowing that it is forming a life-long work ethic. (Whatever you do, work at it with all your heart, as unto the Lord... Colossians 3:23)
 
Thank you, Lord, for the gift of the Bible and the wisdom that the scriptures are saturated with. Help me, please, to always parent according to your will. Amen.
 
Will you pray this prayer with me today and raise your child "in the way that they should go?"  
What are your favorite verses that help you parent?

Monday, February 11, 2013

If you build it, they will come...

A lovely friend of ours is moving at the end of the month and is giving us her one-year-old hens! The three girls will be moving in fourteen days from now, so this past weekend we decided to get ready. We built the coop, and bought the necessary items from the local farm store... here's what I learned.

The coop I found (don't laugh... okay, well, it deserves a chuckle) on Walmart.com. Really, is there nothing they don't sell? It is a TRIXIE brand coop, "Coop with a View" to be exact. And it is darling. I fell in love with its cuteness and price and decided there was no other coop to be had. It even had a detachable run you could buy with it to give the hens extra room. What a deal!

Or so I thought. It really is cute, don't get me wrong. But, wow, is this thing small. I have checked with a few chicken owners and they assure me it is no big deal and that three hens don't need a lot of space, but I'm not even sure where I'll be able to put the food and water!

Here is a picture of the girls' new home. Coop Corner ~ Girls Only.

The things I like about this coop, or think I will like, are the openings (laying box and coop both have roof openings, the coop itself has three doors, and the run opens on the top, end and side), and the plastic pull out tray for easy cleaning. And did I mention it is cute?


Okay, so with the coop in place we headed down to the local farm store on the edge of town. I already knew we would need to put something comfy for the hens in the laying boxes, and could also cover the ground with said material to keep down smell and catch poo (to be raked out often). I knew I didn't want pine shavings because it would add too much acid to my compost, which is what I'll be doing with this stinky garden gold. So I opted for straw. (Straw, not hay. I learned there is a difference!)

Another lesson: there are two different forms of feed for chickens ~ pellets and crumbles. Luckily I had seen our friends feed the hens when we visited them last week, so I knew that crumbles were what we wanted. Boy, was it cheap! 45-cents a pound. That seems cheap to me. I bought a 10-pound bag for $4.50 that should last me a couple weeks. We'll see how long it takes them to go through it.

So with feed and straw in hand, we went to look at feed and water containers. What a lot of options! In size and material mostly. The options were either galvanized metal or plastic. The helper warned that plastic can freeze and crack in the winter, but since most of the smaller options are plastic, we still went with plastic. I had to weigh how much space I wanted to dedicate to these contraptions compared to how often I wanted to be out there filling them up.

We came home with these cute (I'm learning that I'm clearly a sucker for cute) one-gallon matching feeder/waterers. They are a bit flimsy and I'm not sure they'll be our long-term option, but we'll start here and see what we learn.

My next step is to spray the coop down with a white vinegar solution to ward off mold and bugs in hopes of giving the girls a healthy new home. Then I think I'll feel ready for our new additions!

Check back in a couple weeks to read about Moving Day!